 My favorite experience with dairy-free cooking came a couple years ago, when WB-11, the popular New York television station, invited me to appear on its morning show. The producers had heard of my wizardry with non-dairy dishes and wanted to do a blind tasting in which three of my dairy-free desserts would face off against their dairy counterparts. Talk about a triumph: The results of that little presentation were astounding. The tasters found that one of the desserts (an apricot mousse) tasted virtually identical made either way, while the other two (a cheesecake and a chocolate hazelnut mousse torte) were more delicious made without dairy products.
I believe that anyone, even the novice cook, can prepare virtually any dish without dairy products and come up with something delicious. I can, and I know that most other people can, too. But a lot of people don’t accept a sweeping statement like that. They believe that any meal that is traditionally prepared with milk or butter can never be as good if those ingredients are not present. This book proves just how wrong this assumption is – and the feeling of liberation it will give cooks no longer faced with major recipe restrictions will be wonderful to watch. How do I know this? Because over the past 29 years, as a cooking teacher, cookbook author and as owner of a bakery, a kosher catering business, and Levana Restaurant in Manhattan, I’ve learned a thing or two about dairy-free cooking. I had to because, like 50 million other Americans, I am mostly lactose-intolerant. And like my clients and an estimated 25 percent of American Jews, I observe the kosher dietary laws. This means that it is verboten to mix meat and dairy in the same meal. Thus, in one fell swoop, I am recasting vast numbers of dishes and many delicious desserts which had been previously barred from many meals. Observing kosher requirements implicitly means I make sure not to use any of the products that purport to be dairy-free yet still contain traces of whey, butter and other banned ingredients, which suits the lactose-intolerant community as well.
The truth is we all love dairy products, but that love is too often unrequited by our religion, our bodies, or both. My family, friends, customers and students are always clamoring for alternatives that are free of the offending ingredients. Although I give cooking demonstrations on every imaginable culinary topic, I get the most requests for dairy-free cooking.
It is important to note that I do not use simple substitutions. For years, I have experimented and played with ingredients that most cooks have ignored, such as soy and all other non-dairy (rice, oat, grain, almond, coconut) milks, other soy products, nut butters, flours, and alternative sweeteners. For example, many kosher cooks feel they must use non-dairy creamer instead of milk products, or margarine instead of butter, and just accept the compromised flavor. I don’t think that’s tolerable at all, and so I have a different approach – one that uses only natural products. My number one theme is to demolish the notion that someone cooking with restrictions must rely on substitute ingredients that are “sort of” the same. No. Every ingredient I use stands on its own merits as a delicious, natural, wholesome addition to a recipe that a reader may not have thought possible. Lest you misconstrue the purpose of this book, I hasten to add that it doesn’t provide an excuse for having a field day emulating rich junk foods such as cheeseburgers, salami-and-cheese sandwiches, pepperoni-and-cheese pizza and Goodness knows what other calamity. I have no complicity whatsoever with the fast-food crowd. My repertoire is simple yet politically correct though and through, from a nutritional as well as a kosher standpoint. So, I invite you to enjoy my dairy-free renditions of your favorite treats without fear or guilt!
Sources: Rather than give you a long tedious list of sources for all non-dairy ingredients, I am referring you once for all to a wonderful book, just recently published, compiled by Alisa Fleming, who also started a major non-dairy site, www.godairyfree.com. The book is called “Non-dairy made easy”. Since we share a passion for good and healthy non-dairy cuisine, it was only natural that our paths would cross. There is no consideration Alisa hasn’t addressed. Each item’s features are extensively itemized wherever applicable: whether it is organic, kosher, vegan, gluten-free, soy-free, dairy equipment, etc…, in short, everything you need to know: It’s all in!
Apple Nut Muffins
Yields 12 to 15 medium muffins
This recipe gives you an unlimited opportunity to play with sweeteners, fruits, nuts, and flours (see below), making endless permutations and creating as large and nutritious a selection of muffins as you will ever need. See how it works? Eating this kind of muffin is actually a good kind of weakness, so don’t worry if your kids clamor for more!
Ingredients:
- Vegetable spray
- 1 cup soy milk or any other non dairy milk (rice, oat, almond, grain)
- 2 large eggs
- 1/3 cup vegetable oil
- 1 cup dark brown sugar
- 2 Granny Smith apples, unpeeled, cored and grated coarsely in a food processor
- 2 cup old-fashioned oats
- 3 cups all purpose flour
- 1½ teaspoons baking powder
- 1 teaspoon baking soda
- ½ teaspoon salt
- ½ cup raisins
- ½ cup chopped walnuts or pecans
- 1 teaspoon cinnamon
Instructions:
- Preheat the oven to 375ºF. Spray a 12-cup muffin tin with vegetable spray
- Combine the milk, eggs, oil, brown sugar and apples, and mix thoroughly
- In another bowl, combine the oats, flour, baking powder, baking soda, salt, raisins, and nuts
- Add the dry mixture to the milk mixture. Combine gently but thoroughly with a spoon, taking care not to over mix, which would toughen the batter
- Pour the batter into the prepared muffin pans
- Bake for about 30 minutes, or until a toothpick inserted in the center comes out clean.
All substitutions in equal amounts:
- For the all purpose flour, substitute whole wheat pastry or spelt flour
- For the oil, substitute coconut or flax oil, tehina or any natural nut butter
- For raisins, substitute dried cranberries or other chopped dry fruit (prunes, apricots, dates, figs, etc…)
- For grated apple, substitute grated carrot or zucchini
- For walnuts, substitute almonds or pumpkin, flax, sesame or sunflower seeds
- For brown sugar, substitute sucanat, rapadura, date sugar, or malt sugar (health food stores)
- For cinnamon, substitute ground ginger, cardamom or allspice
- For rolled oats, substitute barley, quinoa, spelt, soy or other flakes.
To make a loaf: This batter will make a delicious bread loaf. Bake in a greased loaf pan in a preheated 350 ºF oven, 45 minutes to one hour, until a knife inserted in the center of the loaf comes out clean.
Babka
8 servings
This yeasted pastry bears an affectionate name in every language (brioche, kugelhopf, kokosh, etc…) and varies only slightly in preparation from one culture to another, but whatever you call it, it is always fabulous, even without the butter and the milk. Do not hesitate to double, even triple the recipe, as it freezes very well.
Ingredients:
- 1 envelope dry yeast
- ¼ cup warm water
- 1/3 cup sugar or honey
- 2¾ cups flour, plus a little more if needed
- ¼ cup oil, plus a little more for brushing
- ½ cup soy or other non-dairy milk (rice, oat, grain, almond)
- 1 egg
- 1/3 teaspoon salt
Topping (optional)
- 1 Tablespoon oil
- ¼ cup flour
- 3 Tablespoons sugar
Instructions:
- Mix the yeast, water and sugar in a cup and let the mixture come to a bubble, a minute or two
- Put all the other ingredients in a mixing bowl. Add the yeast mixture and combine
- Transfer to your dough maker and knead 10 minutes, or knead by hand
- Let the dough rise, covered, in a warm draft-free place one hour
- Preheat the oven to 350ºF.
- On a very lightly floured board or counter, roll out the dough into a thin, 20- by 8-inch rectangle
- Brush the whole surface very lightly with oil
- Sprinkle or spread the filling on the whole surface (filling recipes follow)
- Roll very tightly. Transfer to a greased loaf pan
- Mix the topping ingredients, and sprinkle over the babka (If not using the topping, simply brush with a mixture of egg and water)
- Bake 35 to 40 minutes, until golden.
Fillings:
- Chocolate: Melt 2/3 cup very good quality real chocolate chips with 1 Tablespoon oil.
- Cinnamon-raisin: In a food processor, process until coarsely ground: ½ cup golden raisins, 1/3 cup walnuts, ¼ cup brown sugar, 1-2 teaspoons cinnamon.
- Jam: 1 cup good black currant, strawberry or raspberry preserves thinned with 2 to 3 Tablespoons orange juice.
Red Pepper and Zucchini Frittata
6 main course servings
Frittatas are nothing more than giant deep-dish omelets, cut into wedges. Although the principle is always the same – pour a mixture of milk and eggs over sautéed vegetables, start it on a stovetop and finish it in the oven- the variations are endless. Use any filling that appeals to you, combining 2-3 items: sautéed leeks, mushrooms, spinach, kale etc…; grated “Vegan-Rella” cheese; boiled cubed potatoes; cubed smoked turkey or cooked chicken; minced fresh herbs such as chives, dill, parsley, chervil. Frittatas are delicious hot or cold, and make a great main course as well as great hors d’oeuvres, cut in small squares.
Ingredients:
- ¼ cup olive oil
- 1 large onion, diced small
- 4 cloves garlic, minced
- 1 large red bell pepper, diced small
- 3 thin zucchini, diced small
- 3 Tablespoons flour, any flour
- 1 cup soy or any non-dairy milk (rice, almond, grain, oat)
- ¼ cup dry vermouth (liquor stores) or sake (health food stores)
- ¼ cup basil leaves, packed, chopped
- Good pinch nutmeg
- Salt and pepper to taste
- 8 eggs, lightly beaten
Instructions:
- Preheat the oven to 375 ºF
- Heat the oil in an oven-proof skillet, about 10 inches in diameter
- Add the onion, garlic, pepper and zucchini, and sauté until all liquids evaporate
- In a mixing bowl, whisk together the flour and the milk until smooth
- Add the remaining ingredients and whisk
- Pour uniformly over the sautéed mixture in the skillet and cook on a medium-low flame about 5 minutes
- Transfer to the oven and bake another 12 to 15 minutes, until puffy and barely set
Serve warm or at room temperature.

Corn and Salmon Chowder
About 12 servings
Funky meets elegant. With a good baguette and a leafy salad, this chowder makes a different and delicious meal in itself. Try your best to use fresh corn. Scraping off the kernels couldn’t be easier. Stand each ear on a plate and use a sharp knife to scrape off the kernels, cutting as close to the cob as you can.
Ingredients:
- ¼ cup olive oil
- 3 leeks, white parts only, washed thoroughly and sliced
- 1 medium onion, quartered
- 4 ribs celery, peeled
- 6 large cloves garlic
- 1 small bunch flat parsley, stems and all, minced
- 2 quarts (8 cups) water
- 2 cups dry white wine
- ¼ cup packed anchovies, rinsed
- 4 cups corn kernels, preferably fresh, from about 6 ears of corn (use frozen if necessary)
- 2 good pinches saffron
- 6 bay leaves
- Salt (you might not need any. If you do, add more rinsed anchovies) and freshly ground black pepper to taste
- 2 cups soy or other non-dairy milk (rice, grain, oat, almond)
- Good pinch nutmeg
- Good pinch cayenne
- 3 pounds salmon filet cut in 1-inch cubes
- 1 lb. mock crab flakes (optional, but delicious. A natural fish product), chopped
- 2 cups Tofutti brand soy sour cream
Instructions:
- Heat the oil in a large heavy pot
- In a food processor, in batches if necessary, coarsely grind the leeks, onions, celery, garlic, and parsley
- Add the ground mixture to the hot oil and sauté until translucent
- Add the water, wine, anchovies, corn, saffron, bay leaves, salt, and pepper, and bring to a boil
- Reduce to medium and cook, covered, for about 30 minutes
- Add the soy milk, nutmeg, and cayenne, and cook until just hot, but do not boil or the mixture might curdle
- Using an immersion blender dipped directly into the pot, purée about one-third of the soup, leaving the rest chunky
- Add the salmon cubes and the mock crab, if using, and sour cream, and cook for 1 to 2 more minutes, stirring gently to incorporate all additions
Serve hot.
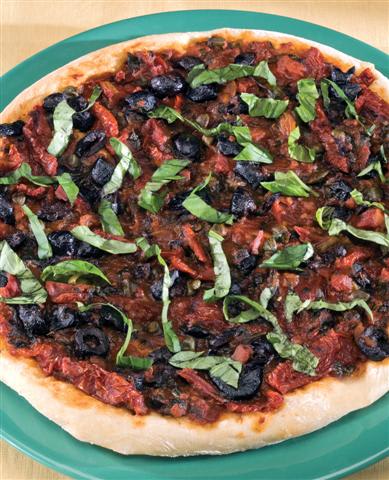
Pizza Puttanesca
12 servings

I used to have qualms about making non-dairy pizza at my demos, fearing my students might find my suggestion slightly disingenuous, until one of them recently exclaimed to me vehemently: “Why can’t we find cheeseless pizza in the States, just as we do in Europe? Where is it written that pizza must always have cheese?” That just did it. That’s right: Traditionally, only a few pizza varieties are topped with cheese, or even tomatoes, and there are quite a few wonderful toppings you can choose from: olives, anchovies, onions, artichoke hearts, eggs, roasted peppers, mushrooms, meatballs, you name it. I will offer my favorite topping (which doubles as a great pasta sauce), then let you use your imagination; including adding a cup or more of grated “Vegan-Rella” cheese if you like. Either way nothing will beat the fun and flavor of homemade, nothing! In a pinch use some store-bought frozen and thawed pizza dough, and just make the sauce.
Ingredients:
Dough:
- 2 Tablespoons dry yeast
- 2 cups warm water
- 1 Tablespoon sugar
- 5 cups flour
- 1 teaspoon salt
- ¼cup olive oil
Instructions:
- Mix the yeast, water and sugar in a bowl. Let the mixture “proof” about 5 minutes, it will start bubbling.
- Add the remaining ingredients. Turn out onto a lightly floured board and knead by hand or in a dough maker about 10 minutes.
- Cover the dough and let it rise about 1 hour in a draft-free place.
- Roll out the dough very thin (about 1 large greased cookie sheet or 2 greased 16” round pans), leaving a slightly thicker rim all around.
- Preheat the oven to 475ºF. Spread the sauce (recipe follows) on the dough, leaving the rim blank. Bake about 15 minutes. If using the cheese, add it in the last 5 minutes of baking. Cut in wedges and serve hot.
Puttanesca Sauce:
Instructions:
- ½ cup extra virgin olive oil
- 1 large onion, chopped
- 8 large cloves garlic, minced
- 1 cup dry white wine
- 1 cup sun-dried tomatoes, briefly soaked in warm water, and cut into strips
- 3 cups canned crushed tomatoes
- ¼ cup capers
- ½ cup oil-cured black olives, halved
- A dozen anchovies, thoroughly rinsed
- ½ cup basil leaves, minced
- 2 Tablespoons oregano
- Good pinch red pepper flakes
- Salt and freshly cracked pepper to taste (taste the sauce before you add any salt)
- Optional: About 1 cup grated “Vegan-Rella” to taste
Instructions:
- Heat the oil in a heavy pan. Add the onions and fry until translucent. Add the garlic and fry 3 more minutes. Reduce the heat and add all remaining ingredients. Cook covered on a medium flame about 10 minutes.
Foccacia:
- Roll the dough about ½-inch thick and place in a greased cookie sheet. Brush lightly with olive oil, and sprinkle with sea salt, minced fresh onion or garlic (optional) and chopped fresh rosemary.
- Poke the dough all over with your finger to make indentations.
- Bake in a preheated 400º F about 20 minutes.
Tilapia Stuffed with Spinach and Pine Nuts
8 main course servings
This stuffing is so fabulous you might consider using it for chicken breasts as well or, quite simply, as a sauce for pasta, thinned with a little non dairy milk or white wine. Do not skip the pine nuts as they add a wonderful layer of flavor. For a more dramatic presentation, you might want to consider stuffing a whole large fish such as trout or bass, and proceed with the recipe (in this case, bake one hour). If you are serving this dish as a first course, simply halve each roll.
Ingredients:
Spinach stuffing:
- ¼ cup olive oil
- 1 large onion, quartered
- 4 large shallots, peeled
- 6 large cloves garlic, peeled
- 1 red pepper, seeded and quartered
- 1 small bunch parsley
- 1 large tomato, peeled, seeded and chopped
- 1 (10 oz.) box frozen spinach, thawed and squeezed thoroughly dry
- ¼ cup basil leaves, packed, chopped
- 1/3 cup pine nuts, toasted 10 minutes in a 300 ºF oven
- ½ cup “Vegan-Rella” cheddar cheese
- Good pinch nutmeg
- Salt and pepper to taste
- 8 fillets of tilapia, about 6 ounces each
- Vegetable spray
- Paprika
Instructions:
- Preheat the oven to 375ºF.
- Heat the oil in a heavy skillet
- In a food processor, coarsely grind the onion, shallots, garlic and parsley, and add to the skillet
- Sauté until most of the liquids evaporate. Add the tomato and fry one more minute, until all liquids evaporate
- Transfer the mixture to a bowl. Add the remaining stuffing ingredients and mix thoroughly
- Stuff each fillet with some of the mixture and roll tightly
- Place the fillet seam side down in a baking dish just large enough to hold all the fillets in one layer, so the stuffing doesn’t ooze out
- Repeat with the remaining fillets and stuffing (you might have a little stuffing leftover)
- Spray the rolls with vegetable spray and sprinkle with paprika
- Bake about 30 minutes, or a little longer, until the fish flakes easily
Serve hot, or at room temperature.
Lemon Coconut Tart
Another wonderful treat I created with the help of tapioca flour. And of course how can I miss, pairing lemon and coconut? You will love to make this tart, because you can both bake the crust fully and make the filling even two-three days ahead of time, and assemble it on party day. Topping it with toasted coconut intensify the coconut flavor and gives it a dramatic presentation. Have you noticed that coconut lovers cannot imagine there is anyone out there who is not crazy about coconut?
Ingredients:
Pie dough:
- ½ cup natural non-hydrogenated margarine (health-food stores), at room temperature
- ½ cup sugar
- Pinch salt
- 2 eggs
- 2 teaspoons vanilla extract
- 1 Tablespoon lemon zest
- 2 cups flour
Lemon Coconut filling:
- 1 cup sugar
- 1/3 cup tapioca flour
- Pinch salt
- 2 Tablespoons lemon zest
- ½ cup fresh lemon juice, strained
- 3 Tablespoons rum or brandy
- 2 eggs
- 1 (15 oz.) can coconut milk
- 1½ cups sweetened grated coconut
- ½ cup sweetened grated coconut , toasted about 12 minutes in a 300 ºF oven
Instructions:
- Preheat the oven to 350 ºF.
Make the Pie Shell:
- With an electric mixer, cream the margarine, sugar and salt until light
- Add eggs one at a time and cream until light and fluffy
- Add the vanilla extract, zest and flour and mix just a few more seconds
- Spread the dough uniformly in an 11-inch spring form pan, coming up the sides
- Crimp the edges all around with 2 fingers
- Pierce the bottom all over with a fork
- Bake 40 minutes or until golden brown. Let the crust cool completely.
Make the filling:
- Put a small pot of water to boil
- Reduce the heat to low, and keep the water at a simmer
- Place a bowl on top of the water, and put in the sugar, tapioca, salt, zest, lemon juice and rum, whisking (beating with an electric mixer will work very well, too)
- When hot, add the eggs, whisking constantly until thick
- Add the coconut milk and whisk only until the mixture looks smooth
- Take the bowl off the double boiler, and stir in the coconut
- Let the mixture cool completely, and pour into the baked crust
- Chill
- Sprinkle with the toasted coconut just before serving.
Creme Caramel
About 10 servings

We grew up with this very unpretentious and delightful dessert, which my mother used to whip up on lazy Sunday afternoons. Caramel, eggs and milk are practically all it takes. I add non dairy milk powder and a little oil to augment the milk fats in the dish and make it come close to the cream-rich original. You won’t be able to discern the difference! The trick with this dish and all egg-based dishes is to bake it until just barely set, as further heating would toughen the custard.
Ingredients:
Caramel:
- ¾ cup sugar
- ¼ cup water
Batter:
- 4 cups whole soy or other non-dairy milk (rice, oat, grain, almond), heated to just below boiling
- 1 cup soy or rice milk powder
- ¼ cup vegetable oil
- ¼ cup white corn syrup
- ¼ cup sugar
- 2 Tablespoons vanilla extract
- 8 eggs
Instructions:
- Preheat the oven to 350 ºF.
Make the Caramel:
- Heat the sugar and water on a medium-low flame in a small saucepan, undisturbed, for about 5 minutes. It will turn a deep amber brown
- Immediately turn off the heat (as sugar could go from just done to burned in no time)
- Very carefully pour into a round ring mold or 8 ramekins
- Quickly swirl the sugar in the molds to let it cover the bottoms and come about half an inch up the sides
Make the Batter:
- Place all ingredients in a blender and blend until completely smooth (or place all the ingredients in a glass bowl and use an immersion blender)
- Pour the mixture into the mold or ramekins
- Place the mold or ramekins in a baking pan containing just enough hot water to come up one third of the height of the molds
- Bake about 40 minutes
- Let the dessert cool
- Unmold by loosening the sides with a knife, then putting a rimmed dish slightly larger than the mold against the opening and flip onto the dish. The caramel will arrange itself beautifully around the custard.
Variations:
- Lemon crème caramel: Reduce the milk to 3½ cups and add ½ cup lemon juice and 2 Tablespoons fresh lemon zest.
- Coffee crème caramel: Add 2 Tablespoons instant coffee powder to the batter and 3 Tablespoons rum or brandy.
- Chocolate crème caramel: add ¼ cup cocoa powder and 1/3 cup semi-sweet real chocolate chips to the milk while it is still very warm to dissolve them completely.
Levana Kirschenbaum is co-owner of Levana restaurant; author of “Levana’s Table: Kosher cooking for everyone” and the upcoming “Levana’s Dairy-Free Gourmet” (November 2007), from which these dishes are excerpted; leader of weekly cooking classes at Lincoln Square Synagogue. To learn more visit www.levanacooks.com or email Levana at levana@levanacooks.com
The words of this author reflect his/her own opinions and do not necessarily represent the official position of the Orthodox Union.